Diablo 4 Solo Necromancer Build – Grim Reaper: In this Diablo 4 Necromancer Build, I’ll show you how to play a LvL 70+ Grim Reaper Necromancer that’s aimed at World Tier 4, and is an evolution of our Reaper Build from World Tier 3. If you’re looking for a Build that absolutely demolishes enemies with Shadow Damage, then this Diablo 4 Grim Reaper Necromancer Build Guide is for you!
Diablo 4 Solo Necromancer Build – Grim Reaper
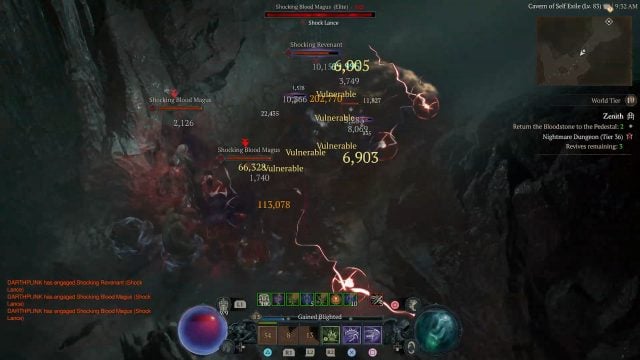
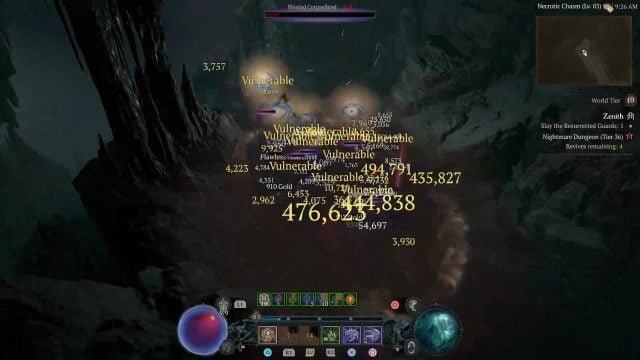
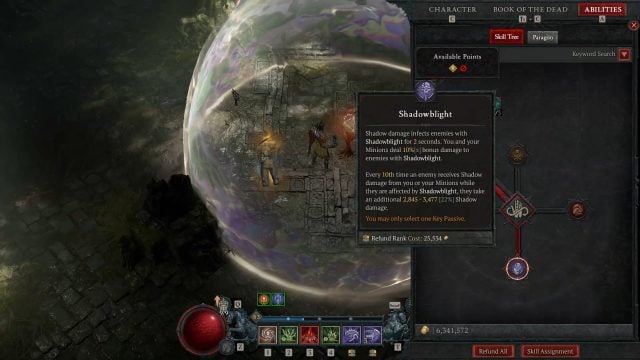
So the general strategy with this Diablo IV Build is to continue to use the Blighted Corpse Explosion upgrade to put Shadow Damage Over Time (DoT) on enemies. This will then be stacked to trigger the Shadowblight Key Passive to deal a ton of damage that will hit like a truck. For your Core Skill, you’ll make use of Sever to deal damage to a target as well as the others who get caught in the path of your Scythe as you throw it out. And for every 4th cast, this applies Vulnerable on them.

There are a few reasons why Sever is the better Core Skill over Blight. Blight does Shadow Damage and Shadow DoT, and you can even get the Aspect of the Void to pull enemies in. However, there are some things that Sever does for you that Blight doesn’t. First, you get burst damage. Blight is pretty much DoT or alternating with Corpse Explosion. And when you’re talking about clear speed, you want things to die quickly so getting burst in there is really nice. Second, it has an exceptional range and attacks faster. As such, you can clip through multiple targets, especially those who are buffing the other enemies to make them damage resistant.
What’s more, is the Vulnerable Damage that Sever does. Ideally, you would have this Stat on both of your Rings and Weapon if you’re not using Black River for this D4 Necro Build to make the most of the applied Vulnerability. And at some point, you’ll be using the Exploit Glyph to further boost your Vulnerable Damage.

The general strategy for most fights is to walk in and use Reap, particularly taking advantage of the Acolyte’s Reap modifier, in order to drop a Corpse. And then you’re going to hit Corpse Tendrils to pull enemies, Stun them, and apply the Vulnerable effect. When they’re all grouped up, you’re going to attack them with Sever until they start dying. Once Corpses are on the ground, you’ll use Corpse Explosion to put more DoTs on those who are still alive while reapplying Vulnerable while they’re standing in those AoE puddles.
Finally, I’m using Blood Mist for this Diablo 4 Solo Necromancer Build. Not only does it give you a way to get out of bad situations by making the Grim Reaper Immune, but you can also use it to kite enemies.
Diablo 4 Solo Necromancer Build – Grim Reaper
Once you hit Tier IV you’ll want to start thinking about min/maxing to get the most out of your Build, and that starts with Skills. Thanks to Paragon Boards and to the increased Equipment affixes, you’ll be able to bypass most of the restrictions you previously faced while leveling up. I also won’t get too deep into Skills, as you most probably know how they work by now.

| LEVEL 70+ NECROMANCER SKILLS | |
| Skill | Points Spent |
| Reap | 1 |
| Enhanced Reap | 1 |
| Acolyte’s Reap | 1 |
| Sever | 5 |
| Enhanced Sever | 1 |
| Paranormal Sever | 1 |
| Hewed Flesh | 3 |
| Corpse Explosion | 5 |
| Enhanced Corpse Explosion | 1 |
| Blighted Corpse Explosion | 1 |
| Blood Mist | 1 |
| Enhanced Blood Mist | 1 |
| Ghastly Blood Mist | 1 |
| Grim Harvest | 3 |
| Fueled by Death | 3 |
| Death’s Reach | 3 |
| Death’s Embrace | 3 |
| Corpse Tendrils | 1 |
| Enhanced Corpse Tendrils | 1 |
| Plagued Corpse Tendrils | 1 |
| Reaper’s Pursuit | 3 |
| Gloom | 3 |
| Terror | 3 |
| Crippling Darkness | 1 |
| Stand Alone | 3 |
| Memento Mori | 3 |
| Bone Storm | 1 |
| Prime Bone Storm | 1 |
| Supreme Bone Storm | 1 |
| Shadowblight Key Passive | 1 |
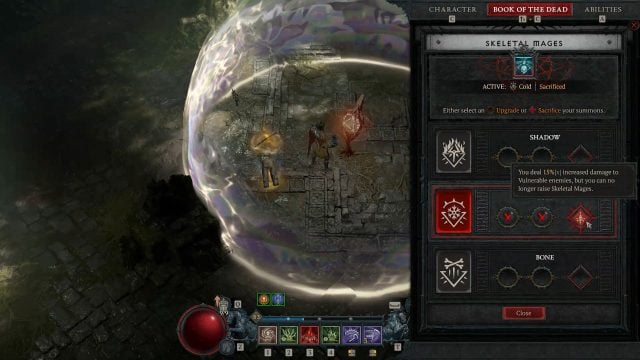
Book of the Dead / Unique Specialization
- Skeletal Warriors – Sacrificed Reaper for more Shadow Damage.
- Skeletal Mages – Sacrificed Cold for additional Vulnerable Damage.
- Golems – Sacrificed Iron for more Critical Strike Damage.

Diablo 4 Solo Necromancer Build: Equipment, Gems, and Aspects
Equipment is the most important part of any Endgame Build, and It’s important to understand that it’s a long-term goal. You won’t have all Paragon Boards available right away, and getting all uniques will probably take a lot of farming, so try to use Legendary Aspects to adjust to your needs while you farm levels and better gear.
Legendary Aspects and Unique Powers
I’ll divide the Equipment into different slots, so it’s easier to understand what you should be using and what affixes you should be looking for. Remember that unique equipment has fixed affixes and powers, so if you are using one, you might need to re-slot a Legendary Aspect into a different piece.
Another important thing to notice is that, when looking for stats, you’ll want to make sure you are fulfilling your Paragon Rare Node requirements. Some rare nodes have very high requirements, and equipment is what allows you to fulfill them. These bonuses often double the rare node effect so, for example, getting an Equipment piece with +100 Dexterity might unlock one or more Node bonuses, giving you a massive bonus as a result.


Helm
Legendary Aspect
Aspect of the Protector: This gives the D4 Solo Necro Build – Grim Reaper a damage shield upon damaging Elites and Bosses, and provides you with a good option to protect yourself.
Affixes
- +Maximum Essence
- +All Stats
- +Maximum Life
- +Total Armor
You can also get Cooldown Reduction here if you can find it in order to further reduce the cooldown of your Corpse Tendrils, Blood Mist, and Bone Storm.
Chest Armor
Legendary Aspect
Aspect of Disobedience: This increases your Armor by up to 50% upon dealing damage and since you deal a ton of damage, you’re going to be tankier.
Affixes
- +Total Armor
- Damage Reduction from Enemies That Are Affected By Shadow Damage Over Time
- +Damage
- +Darkness Skill Damage
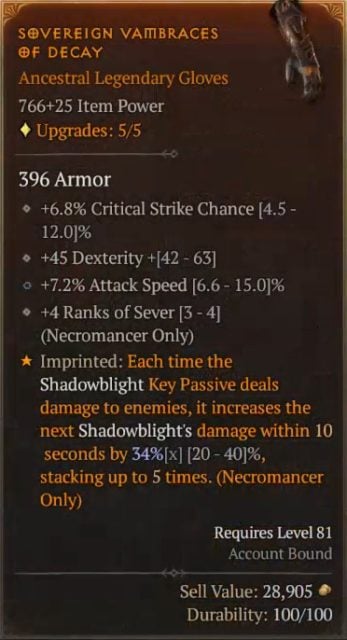
Gloves
Legendary Aspect
Aspect of Decay: This makes it so that each time the Shadowblight Key Passive deals damage to an enemy, it increases the next Shadowblight Damage within 10 seconds by up to 40%, stacking up to 5x. So this would be up to 200% each time you deal Shadow Damage to an enemy 10x. You’ll even notice it during a Boss fight when their Health just suddenly disappears, meaning, that your Key Passive is popping. But the effect of the Aspect of Decay won’t be as noticeable against regular mobs.
Affixes
- +Critical Strike Chance
- +Dexterity
- +Attack Speed
- +Ranks of Sever
You’ll also want to have Intelligence here if possible.
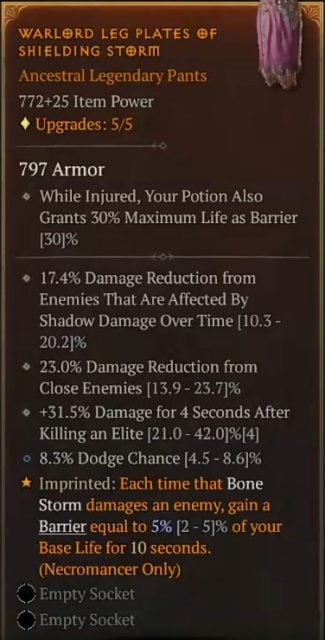
Pants
Legendary Aspect
Aspect of Shielding Storm: This allows you to gain a huge Barrier every time you damage an enemy with Bone Storm. So the Aspect of Shielding Storm makes you super tanky. Remember to pop in Bone Storm when going into a dangerous situation or if things aren’t looking too dicey, pop in Blood Mist, followed by this Ultimate Skill if the circumstance is still bad.
Affixes
- Damage Reduction from Enemies That Are Affected By Shadow Damage Over Time
- Damage Reduction from Close Enemies
- +Damage for 4 Seconds After Killing an Elite
- +Dodge Chance
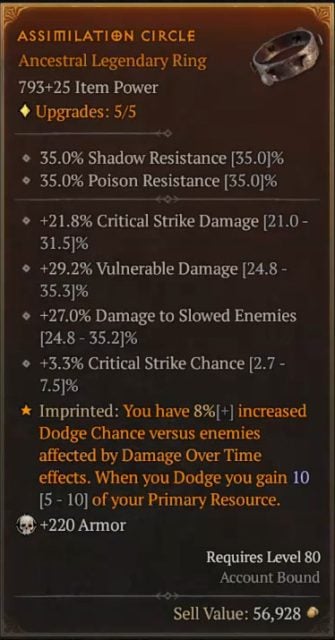
Now, Dodge Chance is really good for this Grim Reaper Diablo IV Necromancer Build because the other way to keep your Essence topped up besides triggering Corpse Explosion and using Black River is through the Assimilation Aspect. This increases your Dodge Chance versus enemies affected by Shadow DoT so when you dodge, you gain 10 of your primary resource back. So you’ll want it to stack. And if you keep your Shadow DoTs on targets, then you’re going to have a higher Dodge Chance against them to receive more Essence.
Boots
Legendary Aspect
Aspect of Explosive Mist: This makes it so that you automatically consume Corpses while moving around when Blood Mist is active, which is fantastic because it’ll put Shadow Damage all over the ground. For every detonated Corpse, the cooldown of Blood Mist is reduced by up to 5 seconds. And one of the nice things here is that the Aspect of Explosive Mist synergizes very well with Black River as it lets you consume up to 4 Corpses at a time.
Affixes
- Essence Cost Reduction
- +Cold Resistance
- +Dodge Chance
- +Ranks of Corpse Tendrils
Unique Equipment
Greaves of the Empty Tomb: This is a great Unique if you happen to get it. What Greaves of the Empty Tomb does is provide you with Max Evade Charges, Intelligence, Essence Cost Reduction, Lucky Hit applies Shadow DoT, which reduces the damage taken from affected enemies. But more importantly, it creates a desecrated ground underneath your Sever specters as they travel. So when you throw out your blade, it’s going to place these DoT pools to create DoT on targets and helps you trigger Shadowblight more.
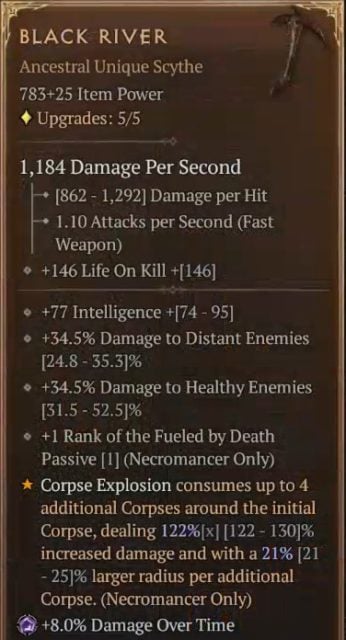
One-Handed Weapon
Legendary Aspect
Cadaverous Aspect: This makes it so that for each consumed Corpse, you’re going to increase the damage of your next Core Skill. It lets you concentrate on using Sever and Corpse Explosion, and then back to Sever to deal a lot more damage.
Affixes
- +Intelligence
- +Damage to Distant Enemies
- +Damage to Healthy Enemies
- +Rank of the Fueled by Death Passive
If you’re not using Black River, then I recommend using another One-Handed Scythe because of Life On Kill. When you stand there and destroy enemies as you’re taking damage, you’re also replenishing your Health simultaneously to remain alive in the middle of combat. You sometimes don’t even realize you’re gaining Life since you stay topped up constantly.
Unique Equipment
Black River: This makes Corpse Explosion deal way more damage, consumes up to 4 additional Corpses, and expands the AoE. Black River allows you to efficiently ramp up the damage you deal.
Offhand Weapon
Legendary Aspect
Blood-Soaked Aspect: This makes it so that you deal Shadow Damage as you move through enemies while increasing your speed. The Blood-Soaked Aspect is optional though compared to the Aspect of Explosive Mist since you want Blood Mist to come off cooldown quicker and deal damage while you’re moving around to consume Corpses, which also replenishes Essence.
OR
Aspect of Ultimate Shadow: This makes enemies take massive Shadow DoT with Bone Storm. In fact, the Shadow DoT is kind of overkill at this point so you’ll probably swap between the Blood-Soaked Aspect and the Aspect of Ultimate Shadow as you go higher in the Nightmare Dungeon tiers since you’ll probably need Bone Storm against most Elites. Additionally, Bone Storm is great because it increases this Diablo IV Solo Necromancer Build – Grim Reaper’s Critical Strike Damage while hitting everything around you to also help build Shadowblight. This Ultimate also reduces the damage you take. As such, enemies will periodically explode for damage.
Affixes
- +Resource Generation
- +All Stats
- Essence Cost Reduction
- +Strength
I’m using a Focus here instead of a Shield due to the native Cooldown Reduction on top of the additional Offensive Aspect you can slot instead of a Defensive one when wielding a Shield.
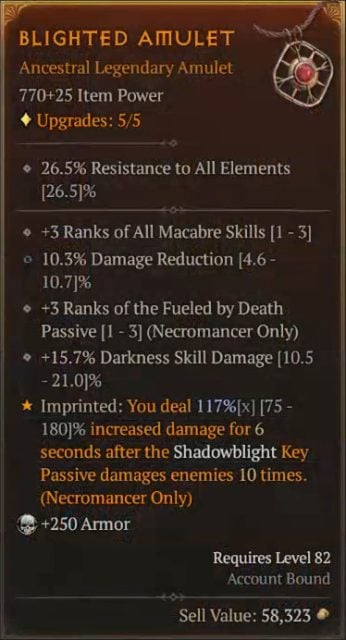


Amulet
Legendary Aspect
Blighted Aspect: This increases your total damage by 6 seconds after Shadowblight triggers 10x so it can be huge. You can even max roll it at 180%! That’s an insane amount of damage, especially when you’re up against big groups with numerous enemies.
Affixes
- +Ranks of All Macabre Skills
- Damage Reduction
- +Ranks of Fueled by Death Passive
- +Darkness Skill Damage
You should also consider increasing the Ranks of your other Corpse Skills.
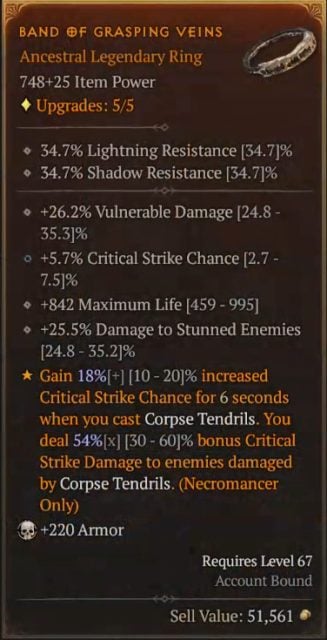
First Ring
Legendary Aspect
Aspect of Grasping Veins: This is going to boost your Critical Strike Chance for 6 seconds as well as your Critical Strike Damage against targets. The Aspect of Grasping Veins is great at amplifying your damage a lot, particularly if you drop Corpse Explosion afterward.
Affixes
- +Vulnerable Damage
- +Critical Strike Chance
- +Maximum Life
- +Damage to Stunned Enemies
You’ll also want to look for Shadow Damage and Critical Strike Damage if possible.
Second Ring
Legendary Aspect
Assimilation Aspect: This makes it so that you have increased Dodge Chance against enemies affected by DoT effects, which in this case, is Shadow DoT. When you dodge, you gain a portion of your Essence.
Affixes
- +Critical Strike Damage
- +Vulnerable Damage
- +Damage to Slowed Enemies
- +Critical Strike Chance
Gems
For gems, you’ll want to slot:
- Weapon: Amethysts to increase your Damage Over Time.
- Armor: Rubies to boost your Maximum Life.
- Jewelry: Skulls to boost your Defense value.
Paragon and Glyphs for the Necromancer Build
When it comes to Paragon Boards, we are mainly going to aim for Rare Nodes that increase our damage output, as well as Glyphs that synergize with our Build. Please note that the order in which I get the Nodes is just a general guideline, and you can adjust it to your current needs.
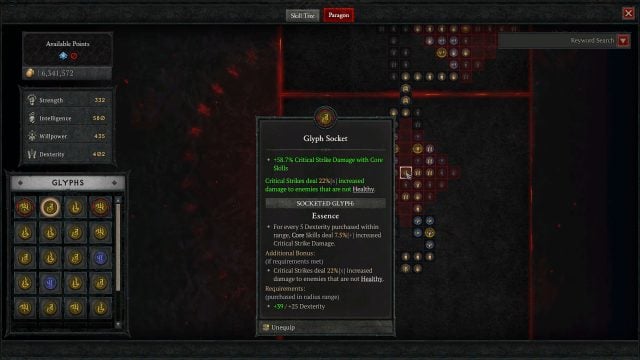
First Paragon Board – Base
The first Glyph you’ll want to slot on your Base Board here is the Essence Glyph, which raises your Critical Strike Damage with your Core Skill. This also makes it so that Critical Strikes still deal 22% increased damage to enemies that are below 80% Health, and is great for getting burst damage with Sever. One of the drawbacks of Shadow D4 Necromancer Builds is they usually don’t have burst so this solves that problem.

Second Paragon Board – Wither
For your Second Paragon Board, you’re going to take Wither. What it does is it gives you a 5% chance to deal 50% bonus damage with your Shadow DoT. Now this chance increases by 1% and the bonus damage increases by 2.5% for every 50 Willpower you have, which you should since there are a lot of other nodes that require this attribute. There’s really no other Shadow Board so Wither is the way to go to amplify your Shadow Damage.
You’ll also gain access to a lot of good Rare Nodes here but you need to focus on those that deal Shadow Damage first because it not only boosts the damage of Sever but also enhances the damage of Corpse Explosion and Shadow DoT. You’ll then supplement it with Shadow DoT later on.
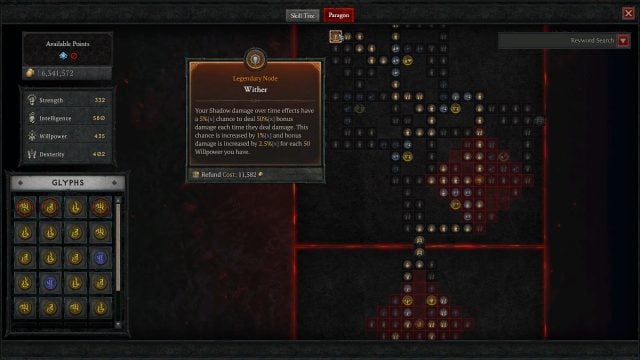

Next, you’ll want to drop the Darkness Glyph and level it up to further improve Shadow Damage, which applies to all sources of this damage type, versus Scourge, which only applies to Shadow DoT. However, I’ve swapped to Scourge here because I’m using Darkness on my third Paragon Board, and I can get more nodes like Malediction to improve Shadow Damage. Meanwhile, Lingering Shadows improves both Shadow Damage and Shadow DoT.
Gnawing Darkness is also fantastic because it raises your damage to enemies affected by Shadow DoT as well as damage to Elites.
Third Paragon Board – Scent of Death
So then you’ll move on to the Scent of Death, which has an average Legendary Node. But what you’ll really focus on are the Rare Nodes like Corrective. Corrective will give you increased Critical Strike Damage to boost Sever’s damage even though DoTs cannot crit and more Potion Healing. Also, Ruin is fantastic because it allows you to deal extra damage and Critical Strike Damage against Healthy enemies.
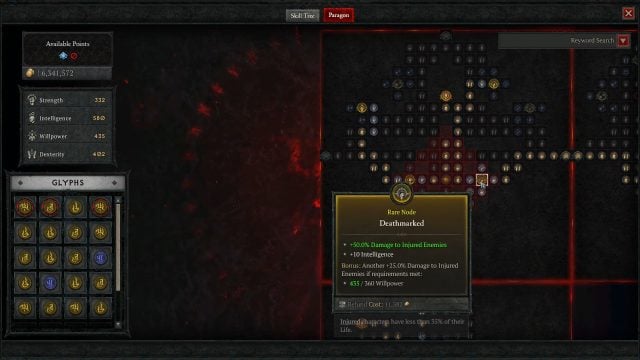

Also, Deathbringer and Deathmark will enhance your damage to Injured targets whose Health is below 35%. This might not seem helpful because they’re probably going to die in a couple of hits anyway but when your DoT is doing a lot of your damage as with this Diablo IV Necromancer Build – Grim Reaper, it can make that 35% go by really fast so they’ll just drop to serve as Corpses. You can then use these to generate more Essence and deal greater damage.
Fourth Paragon Board – Bone Graft
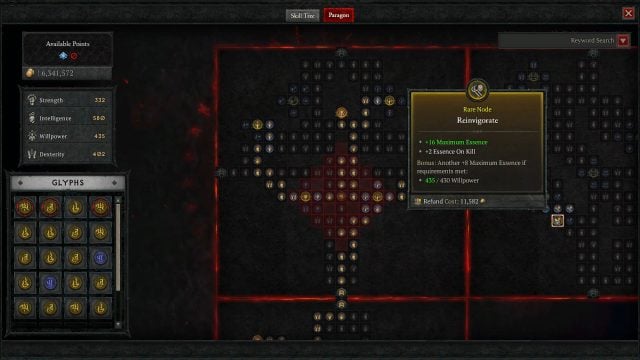
Lastly, you’ll take Bone Graft for the Reinvigorate Node Cluster, which gives Maximum Essence and Essence On Kill. And here, you can get up to 4 Essence On Kill if you take some of the nearby Magic Nodes, helping with your sustain in addition to Corpse Explosion, the Grim Harvest passive, Black River, and the Assimilation Aspect. You won’t encounter many Essence management problems.

Final Tips
In the next 17 levels or so, you’ll want to invest in the rest of the Magic Nodes you’ve missed in these 3 Paragon Boards to further boost your Shadow Damage and Shadow DoT. Some even let you reduce the damage you take. And then if you have more leftover points, then you might want to check out another board.

So that wraps up the Grim Reaper Diablo 4 Solo Necromancer Build, which also allows you to not only solo The Butcher in 10 seconds but also melt Bosses with large packs of enemies.
Stay tuned for more Diablo 4 Build Guides as we continue our way through World Tier 3 Builds. Be sure to check out our Diablo 4 Wiki for any other questions you have about the game and the Builds page if you are looking for more Diablo IV Builds, as well as our Ultimate Beginner Guide and All Classes Overview if you are looking for more Diablo 4 content!
Log in to leave a Comment